Integrate with Plaid for Bank Transfers
Plaid + Wyre Integration
Partners utilize their own Plaid account and activate the Wyre integration within the Plaid dashboard.

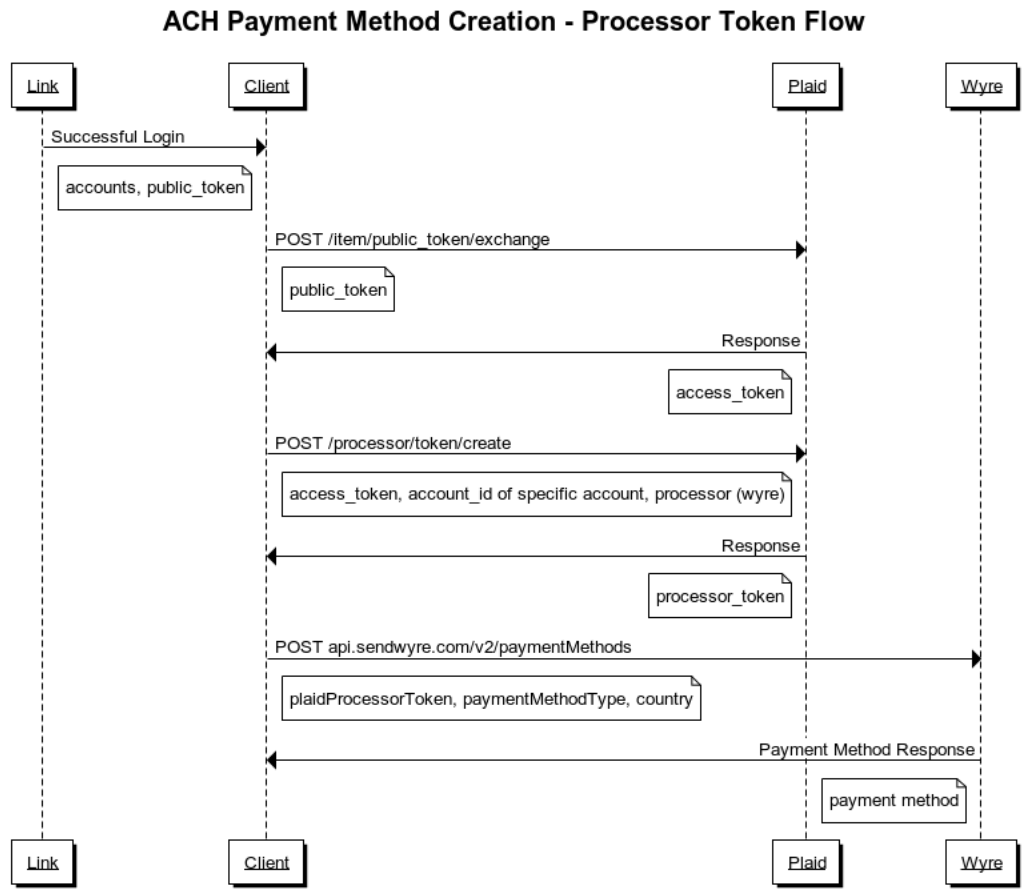
This integration enables end users on Wyre's platform to verify their account quickly through Plaid’s front-end module. Wyre partners will then generate Plaid Processor Tokens on behalf of their end users. This token will allow Wyre to immediately retrieve a user's bank details in order to deposit or withdraw funds on the Wyre platform.
This integration requires Plaid API keys.
Create a Plaid Processor Token
A Plaid processor token is used to enable Plaid integrations with partners. Please refer to the Plaid Processor Token using Wyre page for creating a token.

Plaid Link & Processor Token Flow
**Plaid Link Client Example:
The index.html and plaid.js files live in the same directory. You can run a simple html project locally using something like http-server for testing.
<!doctype html>

<html lang="en">
<head>
  <meta charset="utf-8">

  <title>Wyre Plaid</title>

</head>

<body>
    <button id="linkButton">Open Plaid Link</button>
    <script src="https://cdn.plaid.com/link/v2/stable/link-initialize.js"></script>
    <script src="./plaid.js"></script>
</body>
</html>
const button = document.querySelector('button');
let activatePlaid = async() => {
    // Get a new Link token
    const fetchLinkToken = async () => {
        const response = await fetch('http://localhost:5000/your-api/plaid/create_link_token', {
            method: 'POST'
        });
        const responseJSON = await response.json();
        console.log(responseJSON.link_token)
        return responseJSON.link_token;
    };
    const configs = {
        // 1. Pass a new link_token to Link.
        token: await fetchLinkToken(),
        onSuccess: async (public_token, metadata) => {
            // 2a. Send the public_token to your app server.
            // The onSuccess function is called when the user has successfully
            // authenticated and selected an account to use.
            fetch('http://localhost:5000/your-api/plaid/exchange_public_token', {
                method: 'POST',
                headers: {
                    'Accept': 'application/json',
                    'Content-Type': 'application/json'
                },
                body: JSON.stringify({
                    public_token: public_token,
                    account: metadata.accounts[0].id //Account id of checking or savings
                })
            });
        },
        onExit: async (err, metadata) => {
            // 2b. Gracefully handle the invalid link token error. A link token
            // can become invalidated if it expires, has already been used
            // for a link session, or is associated with too many invalid logins.
            if (err != null && err.error_code === 'INVALID_LINK_TOKEN') {
            linkHandler.destroy();
            linkHandler = Plaid.create({
                ...configs,
                token: await fetchLinkToken(),
            });
            }
            if (err != null) {
            // Handle any other types of errors.
            }
            // metadata contains information about the institution that the
            // user selected and the most recent API request IDs.
            // Storing this information can be helpful for support.
        },
    };
    let linkHandler = Plaid.create(configs);
    linkHandler.open();
}

document.getElementById('linkButton').onclick = () => {
   activatePlaid()
};
Plaid Processor Token Server-Side Web API Example
This can operate as a simple Express app and be deployed to a serverless provider like Firebase for example. This project uses the Plaid SDK version 7.0.0. The variables in the sample below are passed from the "Plaid Link Client Example" above.
//This example is set up as a Firebase Cloud Function, but could also be deployed to Heroku or your preferred provider.
const functions = require('firebase-functions');
const express = require('express');
const cors = require('cors');
const plaid = require('plaid');
const app = express();
app.use(cors({ origin: true }));
app.use(express.static('public'));

// Change sandbox to development to test with live users;
// Change to production when you're ready to go live!
// Using Express
app.use(express.json());
app.use(express.urlencoded({
    extended: true
}));

const plaidClient = new plaid.Client({
  clientID: YOUR_PLAID_CLIENT_ID,
  secret: YOUR_PLAID_SECRET,
  env: plaid.environments.sandbox
});

app.post('/create_link_token', async (request, response) => {
  try {
    const tokenResponse = await plaidClient.createLinkToken({
      user: {
        client_user_id: Date.now().toString(),
      },
      client_name: 'Plaid Test App',
      products: ["auth","identity"],
      country_codes: ['US'],
      language: 'en',
      webhook: 'https://webhook.site/0125021f',
    });
    console.log(tokenResponse)
    response.status(200).send(tokenResponse);
  } catch (err) {
    // Display error on client
    return response.status(400).send({ error: err.message });
  }
});

app.post('/exchange_public_token', async (request, response) => {
    try {
        const exchangeTokenResponse = await plaidClient.exchangePublicToken(
          request.body.public_token
        );
        console.log(exchangeTokenResponse)
        const accessToken = exchangeTokenResponse.access_token;
        console.log(accessToken)
        // Create a processor token for a specific account id.
        let processorTokenResponse = await plaidClient.createProcessorToken(
          accessToken,
          request.body.account,
          'wyre'
        );
        console.log(processorTokenResponse)
        let processorToken = processorTokenResponse.processor_token;
        console.log(processorToken)
        response.status(200).end();
      } catch (err) {
        // handle error
        console.log(err)
        return response.status(400).send({ error: err.message });
      }
});

exports.plaid = functions.https.onRequest(app);
When you create a Payment Method using this API it will return with a status of PENDING. The Payment Method must be approved before it can be used. Once approved, the Payment Method will transition from PENDING to ACTIVE
Using The LOCAL_TRANSFER Payment Method as a Transfer source
When using the Payment Method as the source of a Transfer you will need to use the SRN with the suffix :ach. This will tell our system to route the transaction to the ACH network.
For example, to use the above payment method you would make a request that looks like:
{
  "source": "paymentmethod:PA-W7YN28ABCHT:ach",
  "dest": "account:AC-XX38VYXUA84",
  "sourceCurrency":"USD",
  "destCurrency":"USD",
  "sourceAmount": "100"
}
Updated about 4 years ago
